Creating a New Field
Fields on a form are actually called Page Items, since they can be either for data entry, such as a text box or dropdown, or for display, such as a Section header or table formatting command.
Screen shot of Create Page Item form:

Description of fields on this form:
- Label is the name that will be displayed to the left of the field.
- "Column name" need to be a short, one word name to describe the field in the database.
- The Field Type determines the data type in the database. After choosing the Field Type, choose how the form field is rendered and how it is validated in the Item Display Options.
Some of the less obvious selections:- Text: Data Type - VARCHAR(255). Text-entry box. Under Display options be sure to choose either "Text" or "Text area."
- Enum (dropdown): Data Type - int. Creates an Integer field in database. Usually renders as a drop-down with Enumerations that have been manually populated. Under Display options be sure to choose either "Radio Button","Checkbox", or "Drop Down." Create the enumerations when you edit the field.
- Integer: Data Type - int. You may enter the Validation Min and Max in Item Display Options. Renders as a text input box.
- Long: Data Type - BIGINT(20. You may enter the Validation Min and Max in Item Display Options. Renders as a text input box.
- Float: Data Type - float. You may enter the Validation Min and Max in Item Display Options. Renders as a text input box.
- Time: Data Type - time. This will render as a Time widget
- Date: Data Type - date. This will render as a Date widget
- Year: Data Type - int(5). Drop-down with Years starting from what is entered in Validation Min to this year.
- Boolean: Data Type - tinyint(1). Checkbox.
- Yes/No: Data Type - tinyint(4). Yes/No radio buttons.
- Sex: Data Type - tinyint(4). Dropdown w/ Male/Female enumerations.
- Display - Does not create a field in the database; instead, used to identify display elements such as table begin or end commands.
- It is rare to select "Required," but sometimes you must insist the user fill out the field. If checked, and the user neglects to make an entry in the field, the system will make an alert and will not process the form until the field is filled out.
- Item Display
- If you have selected Enum as the Field Type, be sure to select the correct Input type. Radio button or dropdown. Note: Checkboxes are a difficult case. Right now, there are only single enumerations for checkboxes - the system does not handle multiple checkboxes for a single field. Therefore, create a separate field for every checkbox.
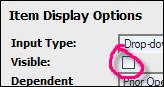
- If you want this field to appear only when another field’s value is selected, uncheck "Visible."
Creating special fields
Collapsing sections: To make collapsing sections, first create a new field that will be the link to make the field reveal/collapse. Make it a type: display and Input type: "Begin collapsing section header." Next, Create two fields to begin and end the table (type: display, input types: Begin table/End table). For the Begin table, make it invisible. Place the fields that belong in this collapsing section between the begin and end table. Then edit the collapsing section header and make the begin table its dependency.
Tables: The Column Number, Colspan, and Rows fields are used when inserting a table into the layout. First insert the table-related fields. Go to Add new field, name the field, select Type "Display," and either Input type "Begin table" or "End table." For the "Begin table" field, set the number of columns in the Cols field.
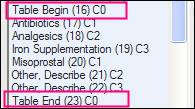
Field list with table fields.
Next edit the properties of each field that is in the table. In certain circumstances, you may wish for a field to span more than one column. Use the Colspan property. (Ignore the Column number field dropdown - it is not used.) Use the close row checkbox to force a new row

- Printer-friendly version
- Login to post comments
 PDF version