Creating a New Form
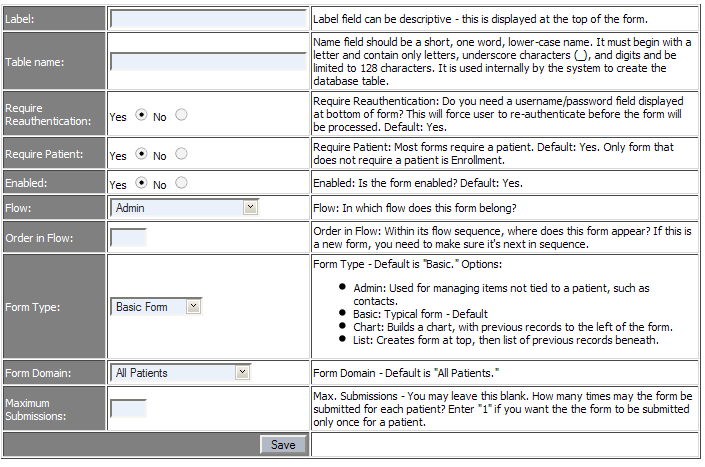
- Click Form Admin from and Administration page. Next, select the last link, "Create a new form."

- Follow instructions:
- Label field can be more descriptive - this is displayed at the top of the form.
- Table name field should be short, one word name. It is used internally be the system.
- Require Reauthentication: Do you need a username/password field displayed at bottom of form? This will force user to re-authenticate before the form will be processed.
- Require Patient: Most forms require a patient. click Yes. Forms whose "Form Type" (see below) is "Admin" should not require patient.
- Enabled: Is the form enabled? Click Yes.
- Flow: In which flow does this form belong?
- You must assign the new form to a "flow." The flow determines what task list the form appears, if it is a required form. If this form is not required, add it to the "unassigned" flow.
- Order in Flow: Within its flow sequence, where does this form appear? If this is a new form, you need to make sure it's next in sequence.
- If the flow needs to appear in one of the task lists, be sure to enter the correct order. It may be easier to edit the form table directly if you need to change the order of multiple forms. Flow order begins at 0.
- You must assign the new form to a "flow." The flow determines what task list the form appears, if it is a required form. If this form is not required, add it to the "unassigned" flow.
- Form Type - Default is "Basic." Options:
- Admin: Used for managing items not tied to a patient, such as contacts.
- Basic: Typical form - Default
- Chart: Builds a chart, with previous records to the left of the form.
- List: Creates form at top, then list of previous records beneath.
- Patient Bridge: Creates multiple instances of the form object for a single record. See a screencast on Editing Patient Bridge forms.
- Header Form: Header form with subforms.
- Form domain - Is the form for all patients or for a sub-set of patients? Default is "All patients."
- Max. Submissions - How many times may the form be submitted?
- Click Submit.
- After you create a new form, you need to add fields to it. Click the "Fields" link on the main Form List page.

You will notice a new area on the right side of the page, titled "Fields." Click "Add new field". See next section for more details.

- You may also preview the form. Previewing does not look 100% like the final version, but it is pretty close to it. Sometimes form preview does not always work due to issues w/ Struts. In this event, you must first click "Generate Dynasite Source" from the main Admin page and restart the app in order to see all of the new fields.
- Printer-friendly version
- Login to post comments
 PDF version

